Saturday, January 3, 2009
Friday, January 2, 2009


Tuesday, December 16, 2008
I have been so sick..
Ugh, I'm so sorry I have not posted anything on my blog since December 3rd. I have been busy with school,.And then came down with a horrible cold, Cant seem to shake it away..Me and my kids will start winter break Monday..Cant wait for that.We all need a break.haha...I will be back soon with new tutorials and things for you :)
Wednesday, December 3, 2008

Monday, December 1, 2008
Bloggers Train

Merry Christmas from Me to You.
Here is some Snowflakes and some Christmas WordArt.
Please show me some love :)
Designers On the Train
Bel Vidotti
Belle of the Ball Tutorials ** YOU ARE HERE
Bits'N'Bobs
Bittersweet Designs
Black Cat Creations
Captivated Visions
Created by Jill
Designs By ALi
Designs by Helly
Designs by Sarah for Pimp My Tags w/ Scraps!
GF Designz
Honored Scraps
HutchaBaby
Jessica Woods
JIC Creations
Julie's Jems
Just a Girl's Designs
Kirsty
Laney's scrappy moments
Lisa's Designs
Missladyhawke
Mousey
Purple Dragonfly Creations
QueenBrat Designs
Rachels_Designs
Rockin’s Ruckus
S & M Creationz
Sametra Designs
Sandra Guicharnaud-Rowe
Scrappy Deesignz
Scrappy Lover
Scraps by Jessica
SerenitySheri
Southern Scrapz
Sweetie-Pea
Tantrum Scraps
TC's Sweets
Twinky
Twisted Angel
Urban Mermaid Designs
VMore Designs
WDDesignz
Wench Designs
Saturday, November 8, 2008
Romeo and Juliet
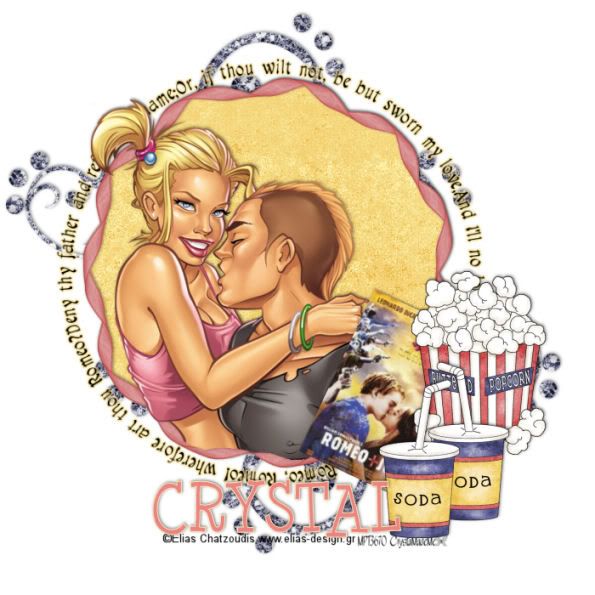 This tutorial was created on November /07/2008 by Ċrÿstàlßellĕ any resemblance to another Tag or Tutorial is purely coincidental.
This tag was created in PSP 9 and can be done in other versions
You will need:
Font of Choice
Movie Poster of your choice..This you can find on photobucket
Script of Choice
Eye candy 4000/Gradient Glow
Tube of Choice .Iam using the wonderful artwork of Elias Chatzoudis.which you must obtain a license to use at MyPspTubes
ScrapKit Movie Night by Designs by Bittersweet. If you wish to purchase this awesome scrapkit, you can here
Open up a canvas size 700x700..Dont worry we will resize later..Fill in with White
Open up Curled Ribbon Frame of your choice..I used the pink one
Resize by 65%
Using your magic want click inside the frame..
Sections/Modify/Expand by 3
Give it a nice drop shadow
V~ -1
H ~ 1
Opacity ~50
Blur ~5
Color~Black
Open up Movie Night paper 9,Copy and paste it below your frame layer
Sectons/Invert/Delete
(Make sure it is under your fame layer)
At the time I went ahead and pasted the tube
Depending on your tube you may want to resize it.
Paste the tube above your frame later..Erase any of the tube that is over laping the bottom of the fame
Apply the same drop shadow as we did to the frame layer
Closing out your white background...Merge the fame/paper and tube layers visible
Unhide your white background
Open up Movie Night Doddle 6
Resize by 75%
Move this layer below your merged layers
(If you notice you will see a bit of the doodle at the bottom go ahead and erase that..You can see what Im talkign about in the preview below)

Duplicate your Doodle laye
Image/Flip/Image Mirror
You can move these around to where you like them best.
Meve the doodle layers togeathe add the same drop shadow as before
Paste the pop corn on the right se..resize by 45%
Paste the Soda cups infront of the popcorn resize 45%
Open up the movie poster of your choice..Im using Romeo and Juliet
as it is one of my favorite movies
Depending on the size you may want to resize it
Image rotate and rotate it by 45% to the right
I placed mine behind my popcorn but left out enough so you can still see it..You can place it where ever you feel looks best on your tag
at this time you can add any other elements you would like..
Now to add some of the script
I had to search the internet to find the script I wanted to use
Click on your top layer in your layer pallet and select your preset shapes icon
Using the circle draw a circle slightly larger then your fame leave that as a vector layer
Choosing a color of choice from your tube..and font of choice with these settings
text size 20
Stroke Null
Make sure under Create As..you have selected Floating
Placing your test tool on the edge of your cicle you should see a A with a Curve line under it..
Type out ..Your Scrpit..
Now it doesnt matter where it sits on your circle in your test box at the font of your test hit your spacebar untail you get your test where you want it..
Now over on your layer pallet delete the circle layer
right click on your floating selection and promote selections to layer, Select none.
Go to eye candy 4000/Gradient Glow/I used the color #f6dc87
(was the color of my paper in my fame)
Lets add your name
Font of choice
Depending on your name you can go smaller or larger..I used size 48
Stroke~1
Forground Color~#f9e6ad
Background Color~#eb8585
Add the same drop shadow as before.
Add the copyright..and lic number if using ptu art.
resize 85%
Merge All Flatten
And Save
Thank you for doing my tutorial,I Hope You Liked It.
Saturday, October 25, 2008
Girls With Guitars
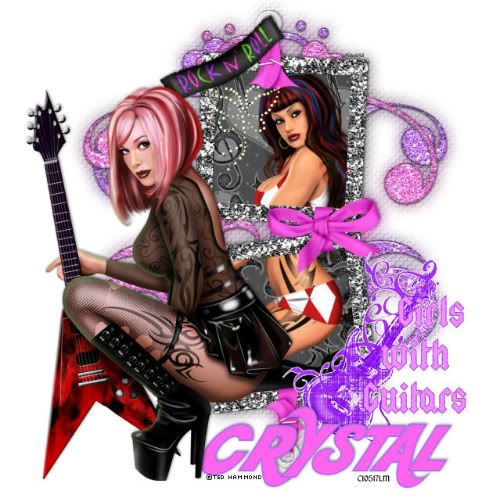
This tutorial was created on October /25/2008 by Ċrÿstàlßellĕ any resemblance to another Tag or Tutorial is purely coincidental.
This tag was created in PSP 9 and can be done in other versions
You will need:
Font of Choice:I used Kool Beans
2 Tubes of choice:Im using the wonderful Art wrok of Ted Hammond which you must obtain a license to use
ScrapKit Punk Rock Chick Designs by Bittersweet. If you wish to purchase this awesome scrapkit, you can here
Ok Lets get started!
Open up a canvas size 600x600 flood fill white.
Open up BD PunkRockChick Frame 2
Resize by 65%
Using your magic Wand click inside the top frame
Sections/Modify/expand by 3
Copy and paste BD Punk Rock Chick Paper 1
Go ahead and resize it by 50%
Sections/Invert/Delete
Move the paper under your frame layer
Usingyour magic wand,Click the bottom frame
Sections/Modify/Expand by 3
Copy and Paste BD Punk Rock Chick Paper 5
Resize by 50%
Sections/Invert/Delete
Move it to the bottom of your frame layer
Open up one of your tubes
Click in both Frames with yoru magic wand
Sections/modify/Expand by 3
Paste your tube over the frame
Sections/Invert/Delete
Closing out your white background..Merge the frame/papers and tube layer visible
Add a drop Shadow
V~ -1
H~ 1
O~ 50
B~ 5
Color~ Black
Open up BD Punk Rock Chick Glitter Doodle 2
Resize by 50% Move it under your frame layer
Open up BD Punk Rock Chick Glitter Doodle 4
Resize by 50%
Image/flip move it So it is over lapping the previous Doodle..But not enough to cover the whole thing up.You may refer to my tag if needed..
Close out the white background,and Merge layers Visible.
Duplicate your merged frame layer on the original layer go to
Adjust/Blur/Gaussian Blur/10
Effects/Textured Effect/Weave
Gap~1
Width~4
Opacity~59
Weave Color Black
Gap Color~#dc61cd
make sure fill gaps is checked
move the weave layer to the very bottom
Copy and paste your main tube now..Place it where you like it..I placed mine so she is on the side of the frame.
Add a drop shadow same as above
Open up BD Punk Rock Chick Sticker 3..resize it by 35% place it on the right hand side of your frame
At this time you may add any elements you would like!
Now for your name..i used the font Kool Beans.but you can use anyoen you choose
Sroke 2 color~#b46df3
Fill Color~#fe65ec
Font Size 72
Add the same drop Shadow as before
Add all copyright and Lic number if you used a PTU artist
Thank you for trying my Tutorial..I hope you liked
You can find my other Tutorials at
Crystalbelle'sTutorial'sandThings
This tag was created in PSP 9 and can be done in other versions
You will need:
Font of Choice:I used Kool Beans
2 Tubes of choice:Im using the wonderful Art wrok of Ted Hammond which you must obtain a license to use
ScrapKit Punk Rock Chick Designs by Bittersweet. If you wish to purchase this awesome scrapkit, you can here
Ok Lets get started!
Open up a canvas size 600x600 flood fill white.
Open up BD PunkRockChick Frame 2
Resize by 65%
Using your magic Wand click inside the top frame
Sections/Modify/expand by 3
Copy and paste BD Punk Rock Chick Paper 1
Go ahead and resize it by 50%
Sections/Invert/Delete
Move the paper under your frame layer
Usingyour magic wand,Click the bottom frame
Sections/Modify/Expand by 3
Copy and Paste BD Punk Rock Chick Paper 5
Resize by 50%
Sections/Invert/Delete
Move it to the bottom of your frame layer
Open up one of your tubes
Click in both Frames with yoru magic wand
Sections/modify/Expand by 3
Paste your tube over the frame
Sections/Invert/Delete
Closing out your white background..Merge the frame/papers and tube layer visible
Add a drop Shadow
V~ -1
H~ 1
O~ 50
B~ 5
Color~ Black
Open up BD Punk Rock Chick Glitter Doodle 2
Resize by 50% Move it under your frame layer
Open up BD Punk Rock Chick Glitter Doodle 4
Resize by 50%
Image/flip move it So it is over lapping the previous Doodle..But not enough to cover the whole thing up.You may refer to my tag if needed..
Close out the white background,and Merge layers Visible.
Duplicate your merged frame layer on the original layer go to
Adjust/Blur/Gaussian Blur/10
Effects/Textured Effect/Weave
Gap~1
Width~4
Opacity~59
Weave Color Black
Gap Color~#dc61cd
make sure fill gaps is checked
move the weave layer to the very bottom
Copy and paste your main tube now..Place it where you like it..I placed mine so she is on the side of the frame.
Add a drop shadow same as above
Open up BD Punk Rock Chick Sticker 3..resize it by 35% place it on the right hand side of your frame
At this time you may add any elements you would like!
Now for your name..i used the font Kool Beans.but you can use anyoen you choose
Sroke 2 color~#b46df3
Fill Color~#fe65ec
Font Size 72
Add the same drop Shadow as before
Add all copyright and Lic number if you used a PTU artist
Thank you for trying my Tutorial..I hope you liked
You can find my other Tutorials at
Crystalbelle'sTutorial'sandThings
Friday, October 10, 2008
Country Christmas

This tutorial was created on October /10/2008 by Ċrÿstàlßellĕ any resemblance to another Tag or Tutorial is purely coincidental.
This tag was created in PSP 9 and can be done in other versions
You will need:
Scrap Kit from BitterSweet Designs Called Country Snowmen
You may Visit her blog here and You can purchase the kit at
TaggersScraps
Lets Begin..
Open up a canvas 700x700 flood fill white
Using your Preset Shape:
Square~Line Style Solid
Width~10
Forground color~#85a8ac
Fill Color~Null
1) Draw out a square in the middle of your canvas
Convert to Raster Layer
Click in side the frame shape with yoru magic wand..
Sections/Modify/Expand by 3
Copy and paste Country Snowman Fun paper 10
Sections/invert/delete/sections select none
Move this layer below your frame layer
Merge both layers visible
2) Draw out another square slightly larger then your previeous square..keep everythign the same except change the color to
#dacab0
Using your magic wand click inside the Frame
Sections/modify/expand by 3
Copy and Paste Country Snowman Fun Paper 6
Sections/invert/delete/sections select none
merge visible the new frame and paper
go to image rotate/free rotate by 15% to the Left
3) We are going to make another frame..Same size as before..only change the color to #5f0413
Using your magic wand click inside the Frame
Sections/modify/expand by 3
Copy and Paste Country Snowman Fun Paper 7
Sections/invert/delete/sections select none
merge visible the new frame and paper
go to image rotate/free rotate by 15% to the Right
4) Open up the 3 snowmen..resize each by 50
Move them to your liking..I moved one snowman in the front and the 2 others behind him...
add a drop shadow of
1
1
50
5
to all
Go ahead and merge your snowmen togeather
5) Choosing a country snowman fun wrap of your choice..Place it at the top of your main frame..I had to resize mine by 43% to make it fit right..
6) Copy and paste a raindrop of choice..Resize to your liking and move it below the fun wrap and snowmen..You want the raindrops to be on the top frame
7) Copy and pasteFun Flower1 resize by 25..Place this Flower in the middle of the wrap
8)Find the glitter snowflake 7 resize it by 25%
Place the snowflake On the edge of the wrap..duplicate and mirror..you may have to move the duplicated snowflake over a bit to look right..
Using eye candy 4000/Gradient Glow/
3
25
100
Color~White
9) Now we are going to add your text'I wrote out Country Christmas across the top of my top frame..
Font~A&S Christmas Script
Stroke~White
Fill~#90934e
size 72
Go to effects drop shadow
1
2
50
5
Color~#600514
go in and do the drop shadow one more time..same settings
10) Hide your white background..and merge layers visible
Resize your image by 85%
11) Add your name
I used Christmas 4 font
size 100
stroke null
fill~#610514
12) using eye candy 400 add a gradient glow
3
25
100
Color white
Go back and do another gradient glow..this time changing the color to
#610514
add it again with the same color
At this time add your copyrights if you used any tubes..
thank you for trying my tut..I would love to see your work..So please email me your results and I will display them on my blog
This tag was created in PSP 9 and can be done in other versions
You will need:
Scrap Kit from BitterSweet Designs Called Country Snowmen
You may Visit her blog here and You can purchase the kit at
TaggersScraps
Lets Begin..
Open up a canvas 700x700 flood fill white
Using your Preset Shape:
Square~Line Style Solid
Width~10
Forground color~#85a8ac
Fill Color~Null
1) Draw out a square in the middle of your canvas
Convert to Raster Layer
Click in side the frame shape with yoru magic wand..
Sections/Modify/Expand by 3
Copy and paste Country Snowman Fun paper 10
Sections/invert/delete/sections select none
Move this layer below your frame layer
Merge both layers visible
2) Draw out another square slightly larger then your previeous square..keep everythign the same except change the color to
#dacab0
Using your magic wand click inside the Frame
Sections/modify/expand by 3
Copy and Paste Country Snowman Fun Paper 6
Sections/invert/delete/sections select none
merge visible the new frame and paper
go to image rotate/free rotate by 15% to the Left
3) We are going to make another frame..Same size as before..only change the color to #5f0413
Using your magic wand click inside the Frame
Sections/modify/expand by 3
Copy and Paste Country Snowman Fun Paper 7
Sections/invert/delete/sections select none
merge visible the new frame and paper
go to image rotate/free rotate by 15% to the Right
4) Open up the 3 snowmen..resize each by 50
Move them to your liking..I moved one snowman in the front and the 2 others behind him...
add a drop shadow of
1
1
50
5
to all
Go ahead and merge your snowmen togeather
5) Choosing a country snowman fun wrap of your choice..Place it at the top of your main frame..I had to resize mine by 43% to make it fit right..
6) Copy and paste a raindrop of choice..Resize to your liking and move it below the fun wrap and snowmen..You want the raindrops to be on the top frame
7) Copy and pasteFun Flower1 resize by 25..Place this Flower in the middle of the wrap
8)Find the glitter snowflake 7 resize it by 25%
Place the snowflake On the edge of the wrap..duplicate and mirror..you may have to move the duplicated snowflake over a bit to look right..
Using eye candy 4000/Gradient Glow/
3
25
100
Color~White
9) Now we are going to add your text'I wrote out Country Christmas across the top of my top frame..
Font~A&S Christmas Script
Stroke~White
Fill~#90934e
size 72
Go to effects drop shadow
1
2
50
5
Color~#600514
go in and do the drop shadow one more time..same settings
10) Hide your white background..and merge layers visible
Resize your image by 85%
11) Add your name
I used Christmas 4 font
size 100
stroke null
fill~#610514
12) using eye candy 400 add a gradient glow
3
25
100
Color white
Go back and do another gradient glow..this time changing the color to
#610514
add it again with the same color
At this time add your copyrights if you used any tubes..
thank you for trying my tut..I would love to see your work..So please email me your results and I will display them on my blog
Monday, October 6, 2008
#1 Template

So this is my first Template for psp..Im not really sure if I like it..Hopefully someone out there will,If you use it I would love to see what you do with it,I will only get better in time.and soon I will have more up.Show Some Love.
You may down load this ...Here
Subscribe to:
Posts (Atom)