This tutorial was created on October /25/2008 by Ċrÿstàlßellĕ any resemblance to another Tag or Tutorial is purely coincidental.
This tag was created in PSP 9 and can be done in other versions
You will need:
Font of Choice:I used Kool Beans
2 Tubes of choice:Im using the wonderful Art wrok of Ted Hammond which you must obtain a license to use
ScrapKit Punk Rock Chick Designs by Bittersweet. If you wish to purchase this awesome scrapkit, you can here
Ok Lets get started!
Open up a canvas size 600x600 flood fill white.
Open up BD PunkRockChick Frame 2
Resize by 65%
Using your magic Wand click inside the top frame
Sections/Modify/expand by 3
Copy and paste BD Punk Rock Chick Paper 1
Go ahead and resize it by 50%
Sections/Invert/Delete
Move the paper under your frame layer
Usingyour magic wand,Click the bottom frame
Sections/Modify/Expand by 3
Copy and Paste BD Punk Rock Chick Paper 5
Resize by 50%
Sections/Invert/Delete
Move it to the bottom of your frame layer
Open up one of your tubes
Click in both Frames with yoru magic wand
Sections/modify/Expand by 3
Paste your tube over the frame
Sections/Invert/Delete
Closing out your white background..Merge the frame/papers and tube layer visible
Add a drop Shadow
V~ -1
H~ 1
O~ 50
B~ 5
Color~ Black
Open up BD Punk Rock Chick Glitter Doodle 2
Resize by 50% Move it under your frame layer
Open up BD Punk Rock Chick Glitter Doodle 4
Resize by 50%
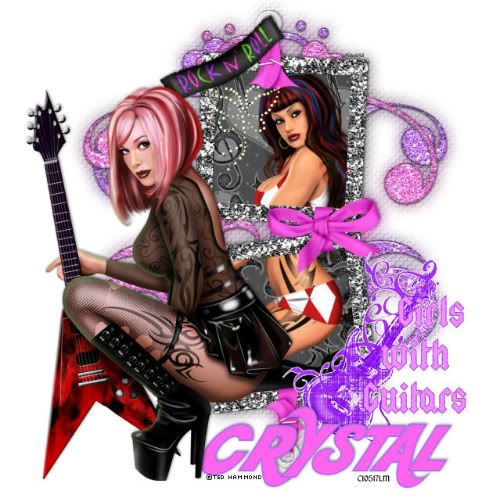
Image/flip move it So it is over lapping the previous Doodle..But not enough to cover the whole thing up.You may refer to my tag if needed..
Close out the white background,and Merge layers Visible.
Duplicate your merged frame layer on the original layer go to
Adjust/Blur/Gaussian Blur/10
Effects/Textured Effect/Weave
Gap~1
Width~4
Opacity~59
Weave Color Black
Gap Color~#dc61cd
make sure fill gaps is checked
move the weave layer to the very bottom
Copy and paste your main tube now..Place it where you like it..I placed mine so she is on the side of the frame.
Add a drop shadow same as above
Open up BD Punk Rock Chick Sticker 3..resize it by 35% place it on the right hand side of your frame
At this time you may add any elements you would like!
Now for your name..i used the font Kool Beans.but you can use anyoen you choose
Sroke 2 color~#b46df3
Fill Color~#fe65ec
Font Size 72
Add the same drop Shadow as before
Add all copyright and Lic number if you used a PTU artist
Thank you for trying my Tutorial..I hope you liked
You can find my other Tutorials at
Crystalbelle'sTutorial'sandThings
This tag was created in PSP 9 and can be done in other versions
You will need:
Font of Choice:I used Kool Beans
2 Tubes of choice:Im using the wonderful Art wrok of Ted Hammond which you must obtain a license to use
ScrapKit Punk Rock Chick Designs by Bittersweet. If you wish to purchase this awesome scrapkit, you can here
Ok Lets get started!
Open up a canvas size 600x600 flood fill white.
Open up BD PunkRockChick Frame 2
Resize by 65%
Using your magic Wand click inside the top frame
Sections/Modify/expand by 3
Copy and paste BD Punk Rock Chick Paper 1
Go ahead and resize it by 50%
Sections/Invert/Delete
Move the paper under your frame layer
Usingyour magic wand,Click the bottom frame
Sections/Modify/Expand by 3
Copy and Paste BD Punk Rock Chick Paper 5
Resize by 50%
Sections/Invert/Delete
Move it to the bottom of your frame layer
Open up one of your tubes
Click in both Frames with yoru magic wand
Sections/modify/Expand by 3
Paste your tube over the frame
Sections/Invert/Delete
Closing out your white background..Merge the frame/papers and tube layer visible
Add a drop Shadow
V~ -1
H~ 1
O~ 50
B~ 5
Color~ Black
Open up BD Punk Rock Chick Glitter Doodle 2
Resize by 50% Move it under your frame layer
Open up BD Punk Rock Chick Glitter Doodle 4
Resize by 50%
Image/flip move it So it is over lapping the previous Doodle..But not enough to cover the whole thing up.You may refer to my tag if needed..
Close out the white background,and Merge layers Visible.
Duplicate your merged frame layer on the original layer go to
Adjust/Blur/Gaussian Blur/10
Effects/Textured Effect/Weave
Gap~1
Width~4
Opacity~59
Weave Color Black
Gap Color~#dc61cd
make sure fill gaps is checked
move the weave layer to the very bottom
Copy and paste your main tube now..Place it where you like it..I placed mine so she is on the side of the frame.
Add a drop shadow same as above
Open up BD Punk Rock Chick Sticker 3..resize it by 35% place it on the right hand side of your frame
At this time you may add any elements you would like!
Now for your name..i used the font Kool Beans.but you can use anyoen you choose
Sroke 2 color~#b46df3
Fill Color~#fe65ec
Font Size 72
Add the same drop Shadow as before
Add all copyright and Lic number if you used a PTU artist
Thank you for trying my Tutorial..I hope you liked
You can find my other Tutorials at
Crystalbelle'sTutorial'sandThings